 Successful email marketing is all about consistency and delivering the right message, to the right audience, at the right time. But how do you keep all your email content scheduled and organized effectively in order to meet these expectations?
The answer is with an email marketing calendar. They're an essential tool for planning, scheduling, and organizing your content and delivery dates to keep your strategy on track.
Here are some things they can help you achieve:
Successful email marketing is all about consistency and delivering the right message, to the right audience, at the right time. But how do you keep all your email content scheduled and organized effectively in order to meet these expectations?
The answer is with an email marketing calendar. They're an essential tool for planning, scheduling, and organizing your content and delivery dates to keep your strategy on track.
Here are some things they can help you achieve:
- Plan the content you'll share via email ahead of time.
- Provide team-wide visibility into your email strategy and execution.
- Help you track your sends and hit deadlines.
Download Your Email Marketing Calendar Template ...
Make it easy on yourself and download your email marketing calendar template. This easy-to-use Excel spreadsheet will give you and your email marketing team the bird’s eye view you need to keep every email campaign you send organized. [Cookie "Get Your Free Email Marketing Calendar Template || https://media.coschedule.com/uploads/Email-Calendar-Template-Download-image.png || Download Template || https://coschedule.com/blog/wp-content/uploads/Email-Marketing-Calendar-Template-1.xlsx.zip"] [Tweet "Get your #email #marketing calendar template from @CoSchedule"]... Or Organize and Schedule ALL Your Newsletters With CoSchedule's Marketing Calendar + Content Organizer
With CoSchedule's Content Organizer and key email service provider integrations (with MailChimp, Campaign Monitor, Constant Contact, and ActiveCampaign), you can:- Seamlessly integrate with your *favorite* email marketing platform. You already have a kick-a$$ email platform you know and love, so why give it up? Easily connect your preferred email platform to CoSchedule with just a couple clicks.
- Write click-worthy email subject lines...every time. Use CoSchedule’s *exclusive* Email Subject Line Tester to optimize and perfect every subject line to drive more opens, more clicks, and more conversions.
- Get full visibility into your ENTIRE marketing strategy. Say “buh-bye” to disjointed marketing content (and constantly jumping from screen to screen). With Email Marketing, it’s easy to see how your email campaigns relate to the rest of your marketing strategy and quickly make adjustments if necessary.

Step 1: Determine Who Owns Each Email Campaign
The first thing you need to identify in your email marketing calendar is who owns each campaign. This person is the point man for every aspect of a campaign and ensures it goes off without a hitch. The primary duties of this role will be:- Writing email subject lines and body content.
- Collaborating with designers to create email graphics (if necessary).
- Determining which list segments will receive the email.

Action Item: Select your email project owner for each campaign. This person may change depending on the campaign that needs to be created by your email marketing team.
Step 2: Determine Email Topics and Themes
Before you begin planning your campaign, you need to decide what topics your emails will cover. Are you launching a new product or promoting an upcoming webinar? Or are you hoping to provide new subscribers with helpful introduction content? Work with your team to decide the topic each email of your campaign will cover. Some common themes are:- A new product launch
- An upcoming webinar
- A weekly newsletter (topics will change week to week)
- The new content you’ve written
- New functionality for your existing product
- An upcoming sale or event

Action Items:
- Work with your email marketing team to determine the topics for each of your campaigns.
- Record each topic in your email marketing calendar template that complements this article.
Step 3: Keep Up With The Status Of Each Campaign
Your email marketing calendar should show the status of each of your email marketing campaigns. That way you, as a manager, can see what’s coming up, what’s staged and ready to send, and what your team is working on next. Break down the status of your campaign into three sections:- New: This is a new campaign that has recently been added to your calendar. No one on your email marketing team has touched this campaign yet.
- In progress: Your email team is working on content, graphics, and more for this email. Once they are complete, they will move on to the project owner for final review.
- Complete: At this point, the email has been designed, the subject lines are written, and the project owner is confident that this email is ready to be sent to the identified list.

Action Items:
- Set up weekly syncs with your email marketing team.
- Review any new campaigns that have been added to the calendar. Update their status.
- Review the in-progress campaigns. Update their status as needed.
- Review completed campaigns. Update their status in your email marketing calendar template when done.
Step 4: Identify The Email Types That You’ll Send To Your Subscribers
Next, you need to identify what types of emails you want to send to your list. There are many different types of email that a marketing team can send but the most common are: Informational Emails- These are emails that provide subscribers with helpful information that shows them how to solve potential problems they are facing.
- These emails can be anything from newsletters to an email pitching a specific piece of content.
- Helpful emails are usually placed at the beginning of your campaigns.
- These emails position your product as the best solution for the problems your audience is facing.
- They mention your product directly and focus on the benefits of using your product over another.
- At this point in your campaign, you want to show your readers that you understand their pain and know how to help them.
- Follow up emails help remind your customers that you offer the best solution to their problem and that they should buy from you.
- These come to your audience a few days after your last pitch email.
- They act as gentle reminders that the solution to their problem is right at their fingertips.

Action Item: Decide the frequency of each email type you are going to send in one campaign. (We’ll cover how many emails you need to send in each campaign in the next section).
Step 5: Define The Number Of Emails That Will Be Sent For This Campaign
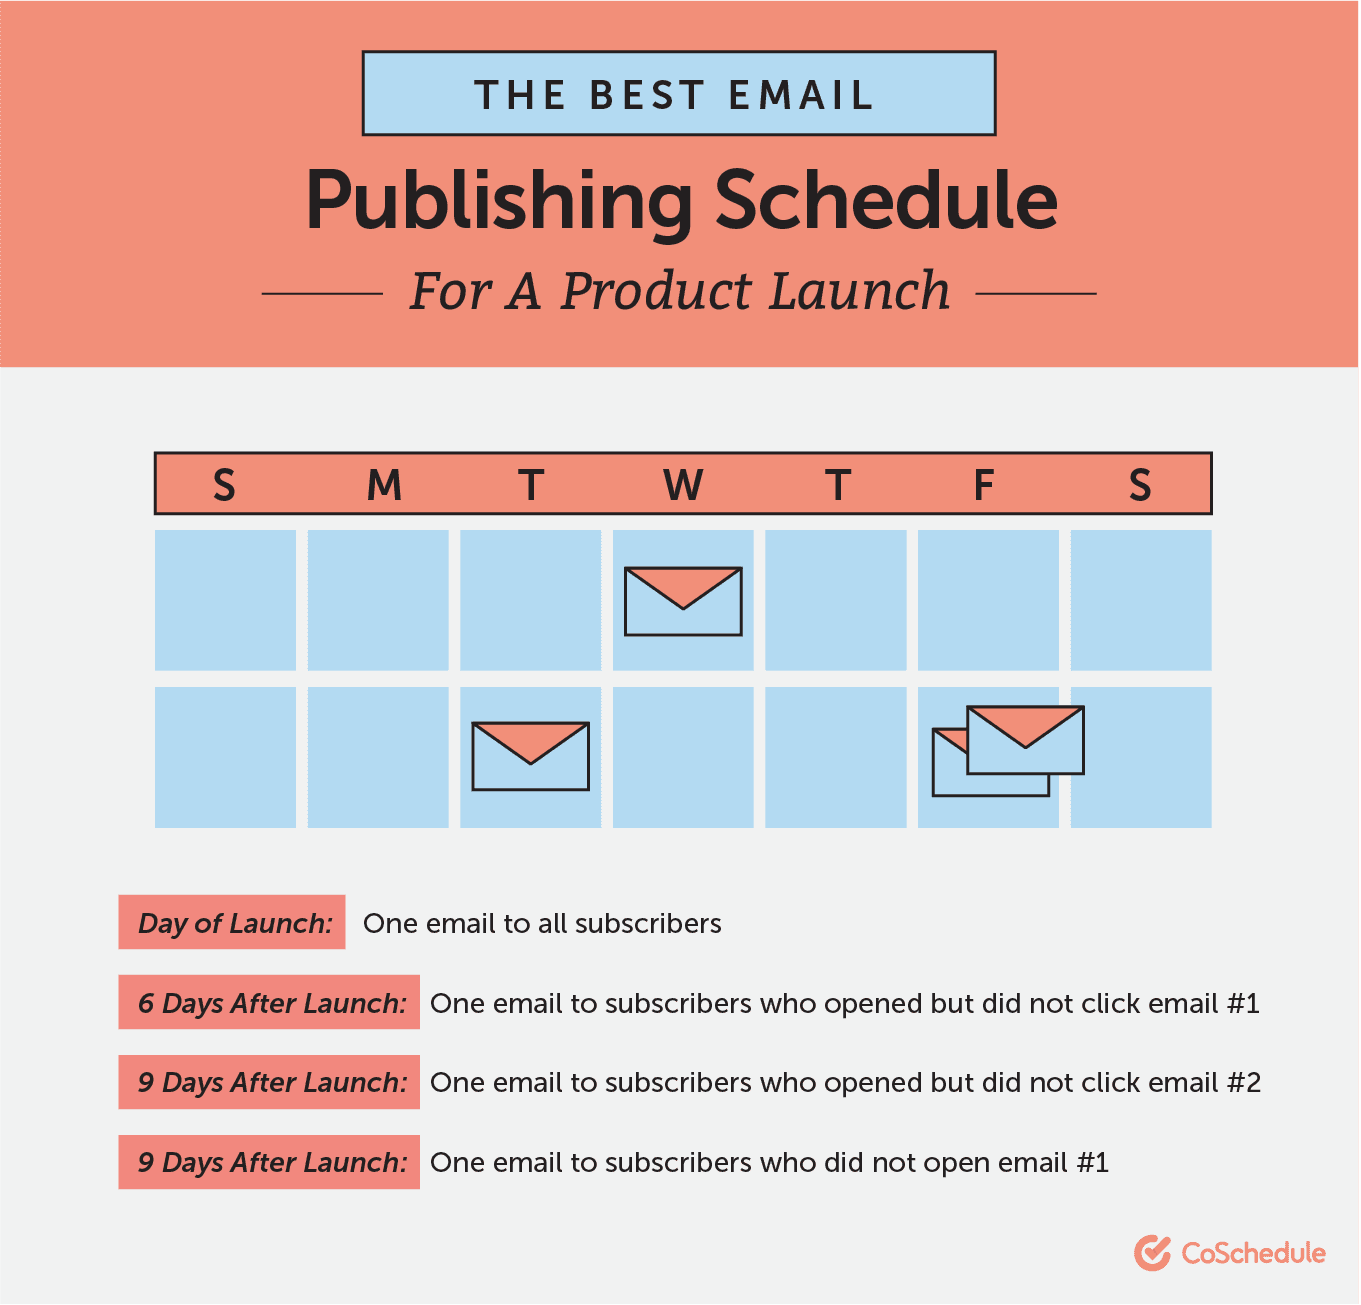
You’ll also need to identify the number of emails that need to be created for each campaign. But that number can be hard to figure out. How many emails are too many? What’s the borderline between spamming your audience and sending them just the right amount of content? Start with these basic email delivery schedules for different types of content you might need to promote: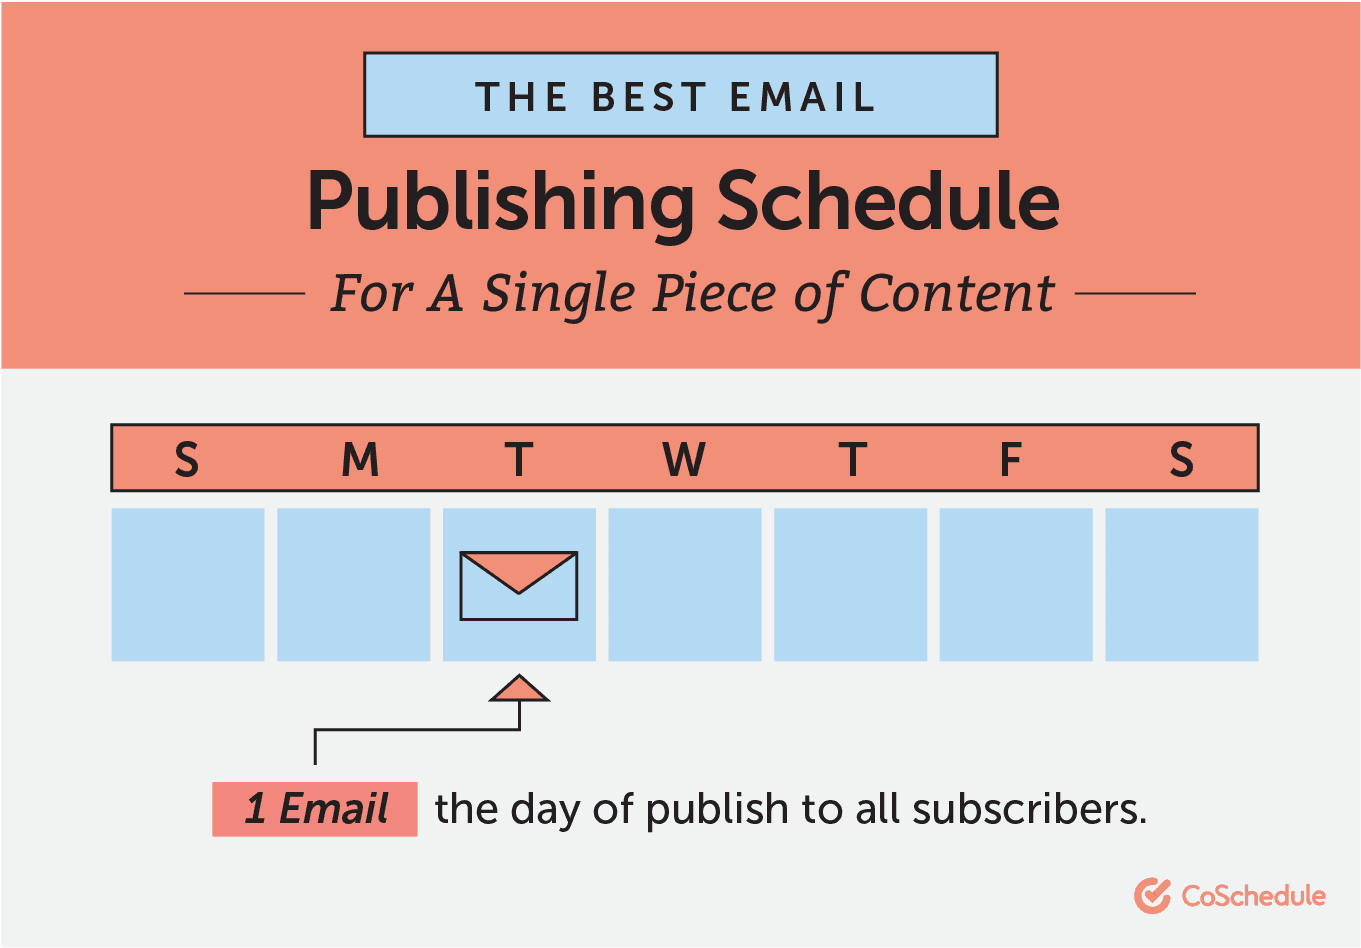 But what if you’re doing more than just a single piece of content? What if you’re promoting a product launch? Here’s your email publishing schedule for that, too:
 What about a webinar email promo template?
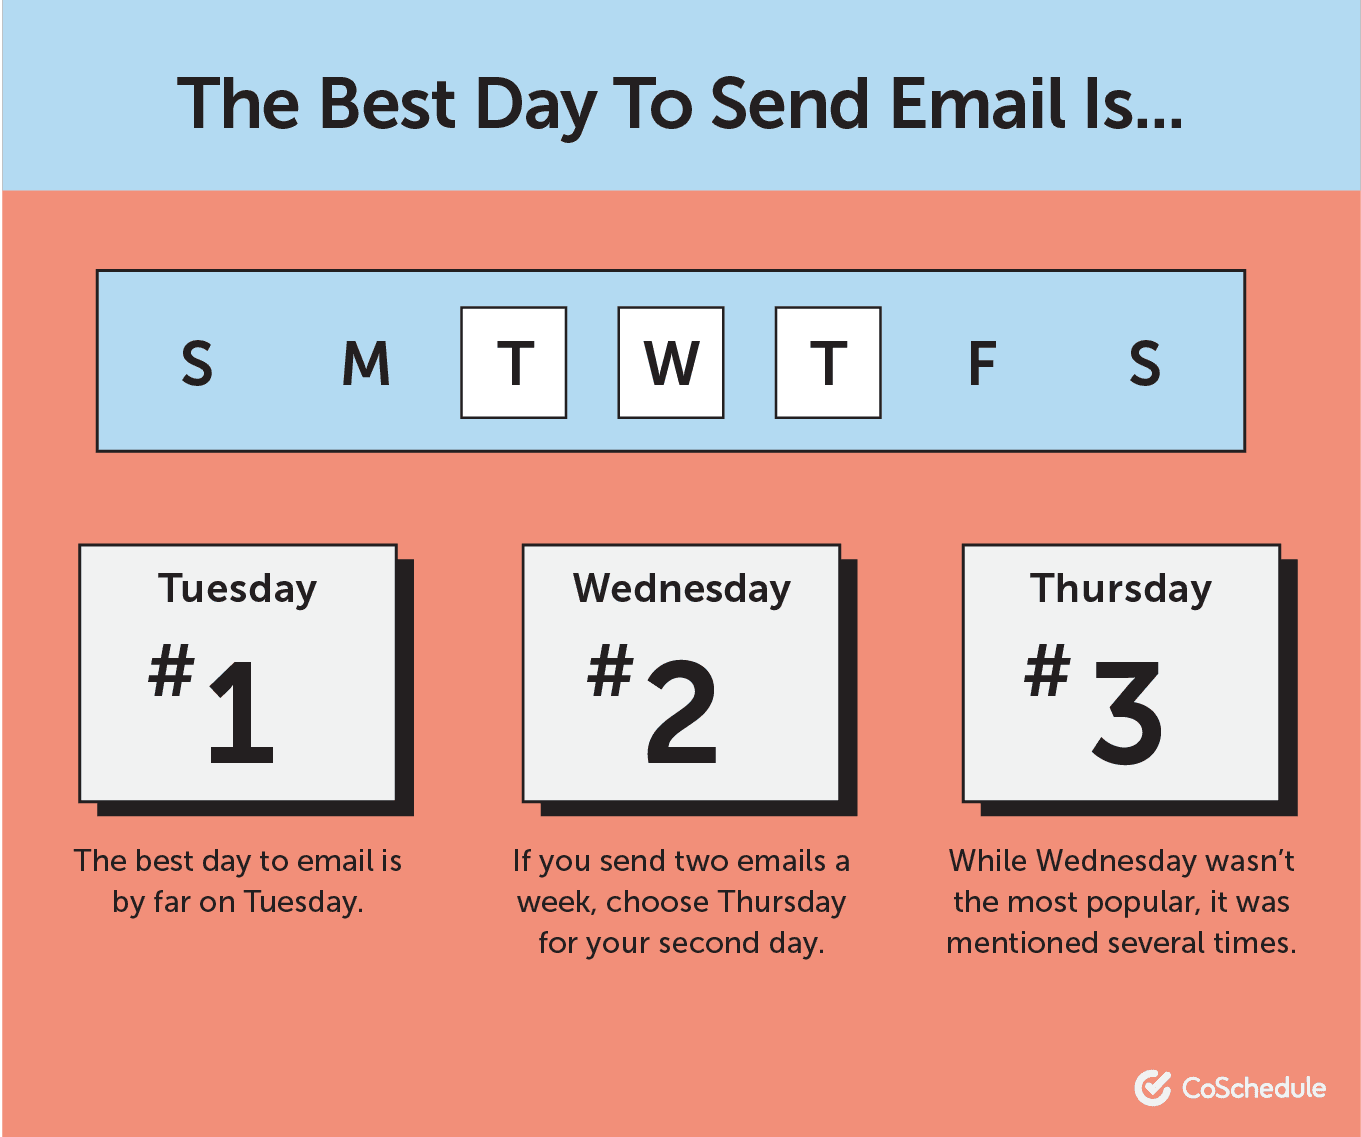
 If you decide to send out a newsletter, try sending on at least once a month or weekly if you can manage to create enough content. If you’re going for one a week or one a month, send your newsletters on Wednesdays as that is considered the best day to send emails.
 Record each email you want to send on your calendar:

Action Items:
- Pull the number of projected emails for each campaign.
- List each email for the campaign in your calendar.
Step 6: Account For Email Campaign Seasonality (As Needed)
Identify which season this campaign is associated with. You could stick to the standard four, or you can also include seasonal events like holiday shopping season, etc. Why would you want to determine your seasons so far in advance? That’s the beauty of using an email marketing calendar; you can plan everything. By planning ahead, you can show your team when they can expect to be working on a larger number of emails and adjust their workload to accommodate them. For example, for a business-to-consumer retail store, it may make sense for your organization to send a lot more email during the holiday season in November and December than in March. So you could have your team working on those November emails earlier in the year (or during their downtime in March) to ensure they won’t be so stressed by the time your holiday campaigns roll out.
Action Item: Decide what season each email campaign is going to be sent.
Step 7: Define The Marketing Persona You’re Targeting With Each Campaign
If your company works with multiple marketing personas who are you trying to speak to in this campaign. As a refresher:Your marketing persona is a document that details your target audience’s who, what, when, where, and why, in addition to understanding general demographics information such as gender, job title, job function, business size, team size, needs, pain points, and challenges.If your team doesn’t have a marketing persona to work with yet, you can create your own. Start by answering the following questions:
- Who are our current best customers?
- What do our best customers all have in common?
- What problem are they experiencing?
- How did they get to the point where they were ready to search for a solution to their problem instead of trying to fix it themselves?
- Why did they go with our product over another?
The target audience of [your organization] is looking for a solution to [problem]. We have found that our audience is more likely to experience that problem if they are [demographic], [demographic], and [demographic].Identify your persona, and record it on your calendar:

Action Items:
- Identify your audience personas.
- Choose the persona that would be most likely to respond to this campaign.
Step 8: Identify The Email Segment You Are Sending This Campaign To
Your email calendar should also contain information about which list you are sending this campaign to. For example, you could have a campaign that goes to everyone on your list, or you could say this campaign should only go to people who attended your last webinar. However, if you don’t have an email list to send your content to, you won’t get very far. Plus, you don’t want to blast your emails to every person on your list because not all of your subscribers are in the same phase of your marketing funnel. For example, if you have a customer who is just learning about your product, they don’t need to see an email that encourages them to buy right this second. So how can you do all of this? First, you need to build your list. Try a few of the following tactics and see which ones your audience responds to:- Add CTA’s to your website.
- Provide them with something of value that they can download in exchange for their email address.
- Publish content on other sites and encourage readers to learn more by joining your email list.
Recommended Reading: 21+ Easy Ways To Build An Email List That Will Skyrocket By 140% In 1 Year
Once you’ve built your email list, you can segment it out based on actions subscribers have taken on your site.
For example, when a subscriber visits a specific product page, add that person into a specific segment for subscribers who are interested in that product. This type of action is possible with many email automation providers like Autopilot, Marketo, and Hubspot.
This segmenting process allows you to get specific and send targeted messages at the right time to the right subscribers. The right message at the right time can help increase your conversions if it’s done correctly.
There are many different ways you can segment your list. In fact, Hubspot has 30 of them listed to help you get started.

Action Items:
- Build your email list.
- Decide how you want to segment your email list.
- Choose your segments based on where your subscribers are at in their buying process.
Step 9: Consider Your Email Suppression List
Once you identify who you are sending your emails to, you may need to determine who you are not sending your emails to. Maybe there is a group in your email list that needs to see a different message than the one you’ve planned for this campaign. Remember when you took all that time to segment your email marketing list? Now you can decide who doesn’t need to see specific emails you want to send. Add excluded segments to your calendar template:
Action Items: Identify which of your email lists should be excluded from each campaign.
Step 10: Clarify The Goal Of Your Email Campaign
What goal do you want your email campaign to accomplish? Are you trying to sell more of a particular product or are you trying to build awareness for your brand? Setting goals touches every single part of your marketing including your emails. These goals help define the purpose of you sending your email in the first place. Each goal that you create for your email campaigns should be S.M.A.R.T or: Creating goals doesn’t have to be complicated. Since you know the topics of each of your campaigns, your goals should come naturally.
For example, if you’re launching a new product, your goal could be to reach X amount of sales within one week. If you’re promoting a webinar, your goal will revolve around increasing your signups.
Creating goals doesn’t have to be complicated. Since you know the topics of each of your campaigns, your goals should come naturally.
For example, if you’re launching a new product, your goal could be to reach X amount of sales within one week. If you’re promoting a webinar, your goal will revolve around increasing your signups.

Recommended Reading: How To Set SMART Marketing Goals
Step 11: Write Your Email Subject Lines
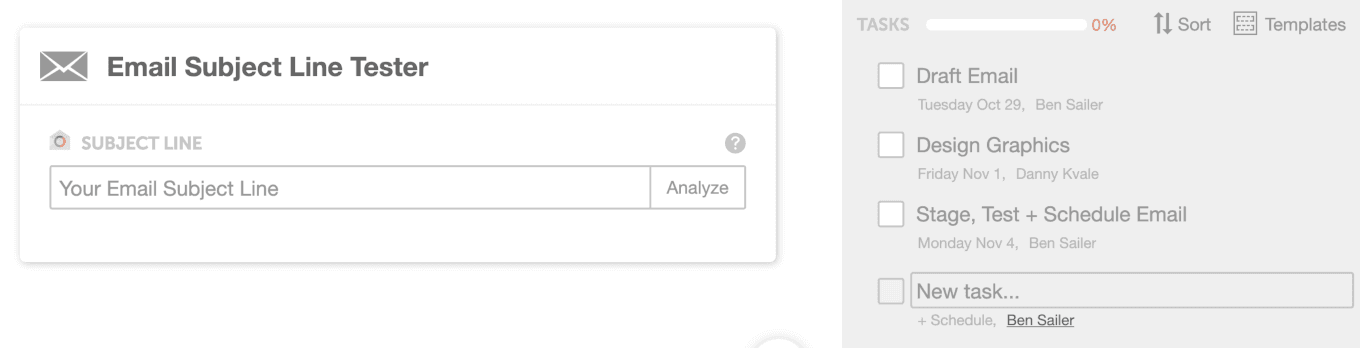
Subject lines can be a bit of a pain to write. What makes a good subject line? Should you include emojis in your subject lines? What language should you add in your subject lines to help increase open rates? CoSchedule just made it easy to write great subject lines with the introduction of the Email Subject Line Tester. Hit Score My Subject Line, and the tester will show you ways to improve your subject line:
 Include at least two subject lines for your A/B test and record them on your calendar.

Action Items:
- Write potential subject lines.
- Run them through the Email Subject Line Tester.
- Choose your top two subject lines for your A/B test.
Step 12: Determine The Dates And Times Each Email Will Be Sent
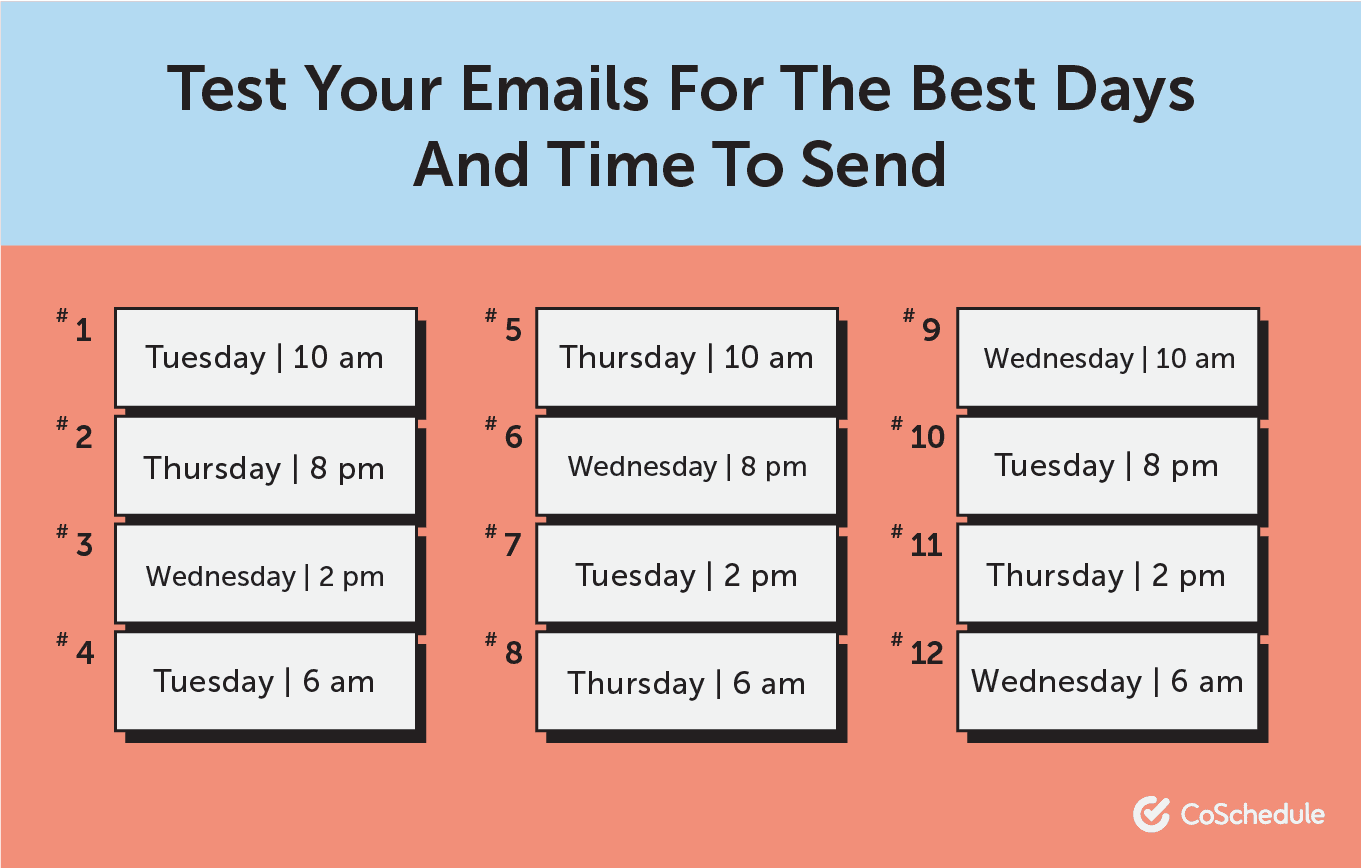
What date and time is each email being sent out on? This is an essential element to establish in your email marketing calendar because it allows your marketing team to determine when they need to start working on an email to make sure that it gets done on time. First, let’s cover the best time to send your emails. According to ten studies the best times to send your emails are: While the best days to send email are:
 Now that’s not to say that these are the times and days to send your emails on. You’ll need to experiment and see which days and times your audience prefers or is the most active. Try the following times and dates to start:
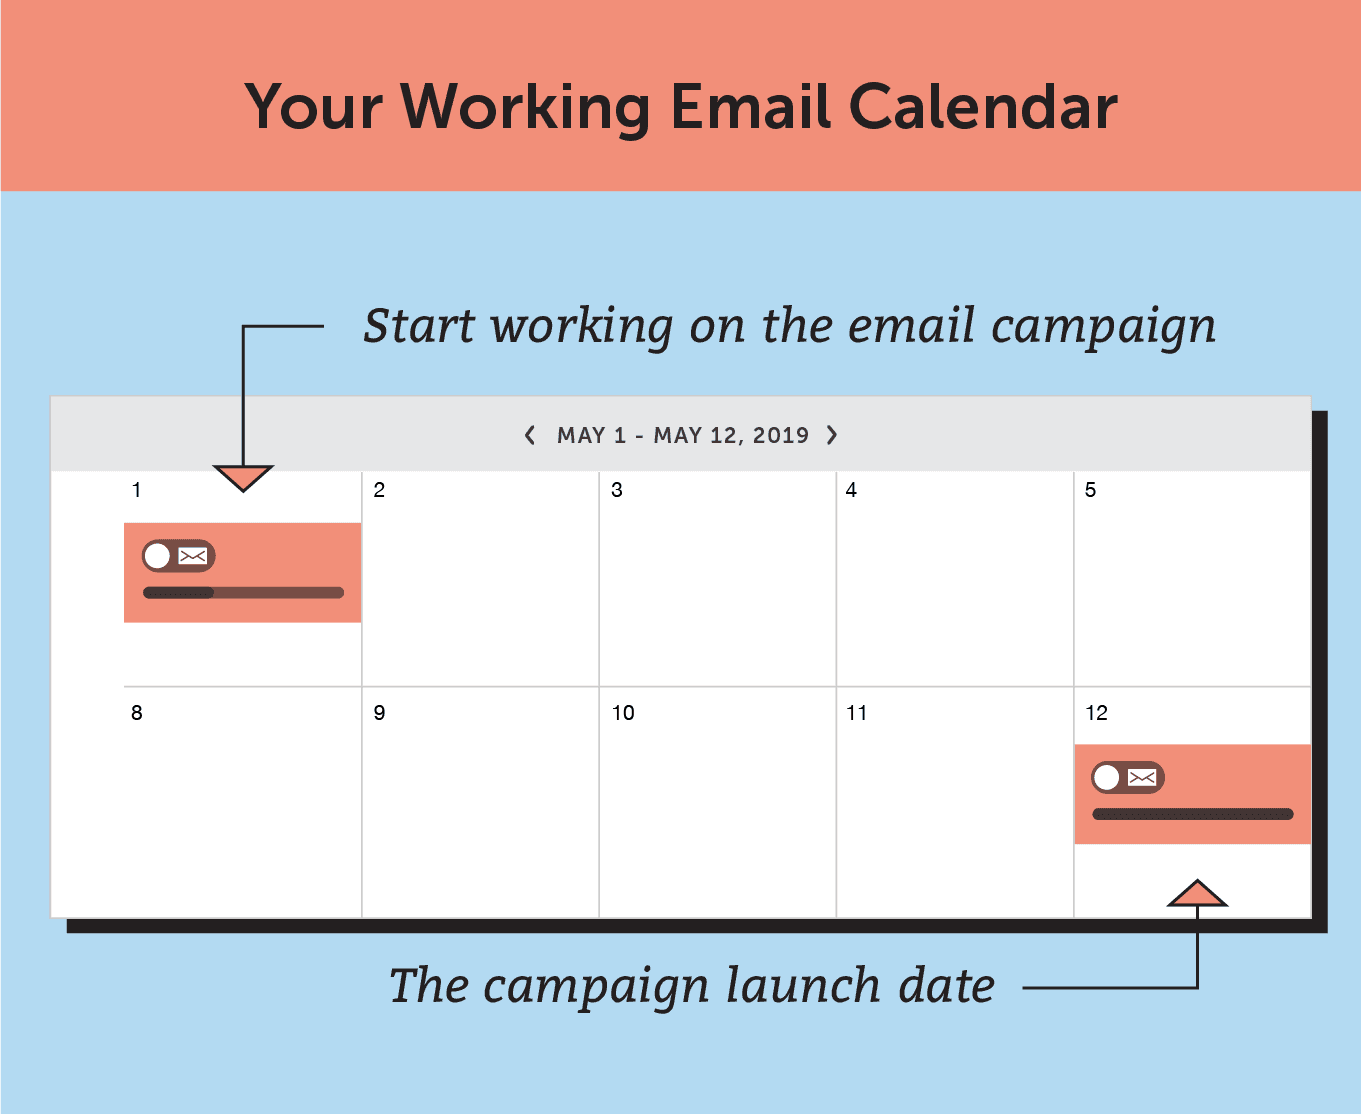
 Once you have the days and times determined for each of your emails sends you can work backward to determine when your team needs to start working on the campaign to get it done on time.
For example, let’s say your email publishing workflow looks something like this:
Once you have the days and times determined for each of your emails sends you can work backward to determine when your team needs to start working on the campaign to get it done on time.
For example, let’s say your email publishing workflow looks something like this:
- Email campaign owner chooses campaign topics and number of sends: 1 Day
- Copywriters write emails: 2 Days
- Copywriters edit emails: 1 Day
- Campaign owner approves emails: 1 Day
- Designers create images and videos: 3 Days
- Designers edit images and videos: 1 Day
- Images and videos are approved by campaign owner: 1 Day
- Copy and graphics are added to email platform: 1 Day
- Email lists are chosen: 1 Day
- Email is ready for publish: 1 Day
 Equipped with that information, you can select publish dates and times that maximize each email you send. Record your publish date times on your calendar.
Action Items:
- Using the best times to send an email and your audience’s preferences, determine what time you’re going to send your emails.
- Repeat the process to decide which days you’re going to send your emails on.
- Use those dates to determine when your team needs to start working on each of your campaigns.
Step 13: Plan Your Email Content
Next, determine which content you'll share in each email. For the sake of this template, we will call each content block in your newsletter a "lead story." Each lead story should be a link, article, product, or other piece of content you'll place in the email. This doesn't need to be the exact email copy you'll write, just the items the email will promote.
Step 14: Include Links To Graphics And Videos That Need To Be In Each Email
One of the last elements to record in your calendar are links to graphics and videos that have been created for each email in your campaign. This is important for your entire email marketing team because they need to be able to access which images and videos are associated with which email. If everything is in one folder, you run the risk of the wrong image being sent to the wrong email.
Recommended Reading:
Each image and video should be linked to in your calendar, so it is easily accessible by the campaign owner.

Action Items:
![Email A/B Test Results in the Email Marketing Calendar]()
- Work with designer to create graphics or videos for your emails.
- Upload them to a file storing system like Dropbox or Google Drive.
- Link back to the folder in your calendar.
Step 15: Record The A/B Test Results Of Your Subject Lines
After you have sent your campaign, identify which of the two subject lines you created, won the A/B test. Most email service providers allow you to A/B test your subject lines within the platform. Based on how each subject line performs, your email platform will take the winning subject line and send it out to the rest of your list.
Action Items:
- Pull the results of your A/B test.
- Record the winning subject line.
How to Plan, Organize, and Schedule Email Content With CoSchedule
The spreadsheet-based template included in this post is a great low-cost option to get started. But you might soon find it's somewhat limited. In that case, it may be time to consider using CoSchedule's marketing calendar and Content Organizer with email service provider integrations (MailChimp, Campaign Monitor, Active Campaign, and Constant Contact). Here's how to get set up and apply this process using CoSchedule.Setting Up Your Account
Follow a few simple steps to get started:- Connect your selected ESP. You can choose your provider under Settings.
- Add team members to your account (if you haven't already). Give your team visibility into your email marketing strategy.
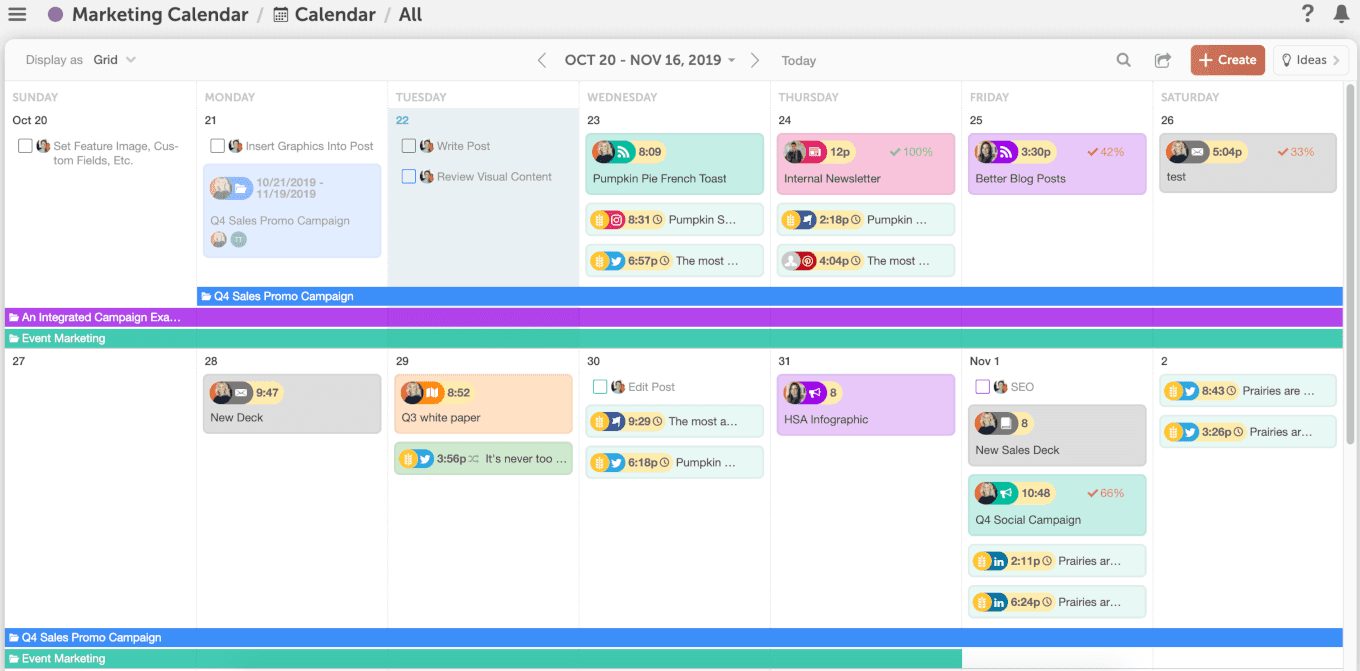
- Head over to the Marketing Calendar. This is where you'll get started creating your email.
 Alternately, if you prefer to manage projects using a Kanban board, you can also use the Kanban Project Dashboard:

Add an Email Newsletter to Your Marketing Calendar
Now, if you have your email service provider connected to CoSchedule, you can start planning and scheduling email content. To begin, either click a day on the calendar, or click on the +Create button on the calendar: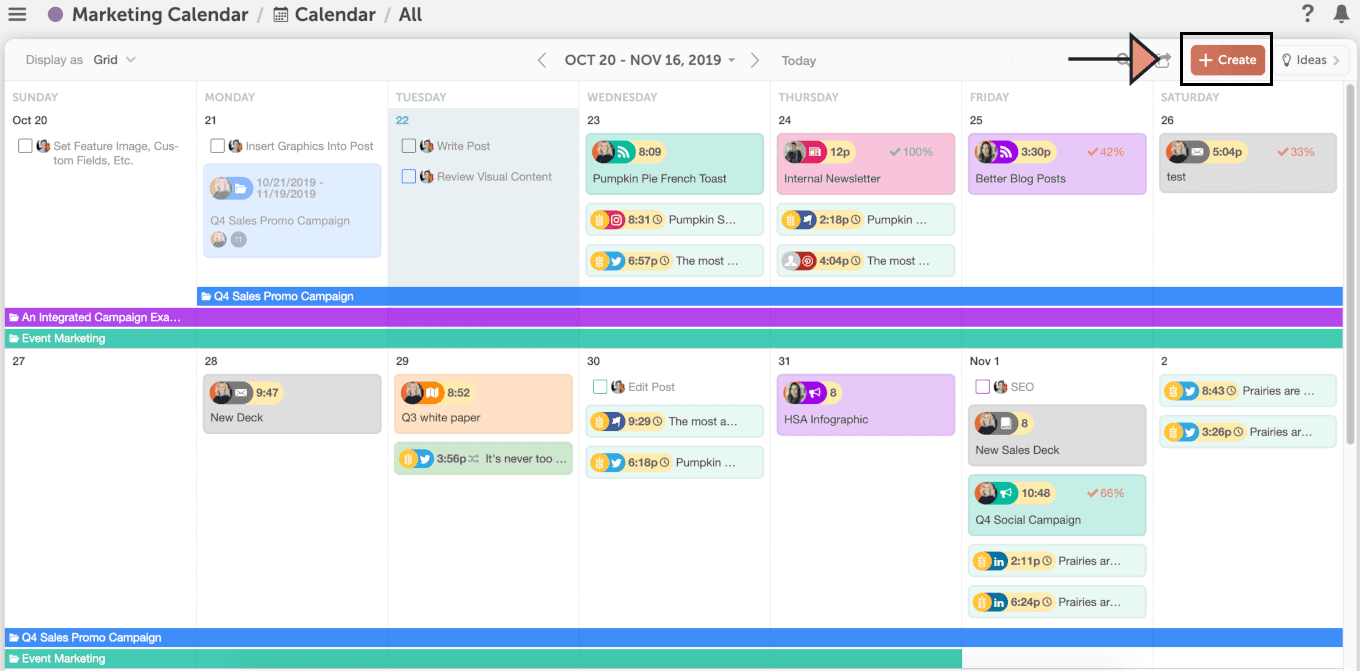 If you're using the Kanban Project Dashboard, you can start by clicking the + sign at the top of a column, or by clicking the +Create button:

Add a Description
Here's a quick look at what the interface looks like within a project in CoSchedule. While we'll go through each area you see below shortly, for now, enter a text description of your email in the Description field:
Add Tags for Email Type, Buying Season, and Email List
Next, you can use Tags to organize email content by some of the other elements mentioned earlier in this post (like the type of email, the buying season it's aimed at, the email list segments that should receive it, or anything else that makes sense for your needs). Start by clicking +Tag underneath the Description field, and you'll see a list of tags you've created: Now, how do you actually create and set which tags are available in your account? Head over to Settings in the left-hand navigation:
 Then, scroll down a bit to and add custom tags:

Set Up a Workflow Using Task Templates + Custom Statuses
When your team works on creating your email content, they'll need a clear workflow to follow. Planning those workflows into checklists will help keep production on track, help ensure that deadlines are met, and remove ambiguity around who is doing what (and when they'll get it done). You can do this in CoSchedule using Task Templates. In the screenshot below, you'll see a few things:- Where to find your Task Templates. They're labelled in the upper right of your screen.
- A list of templates. You can create multiple checklists for all different types of projects (not just email).
- Controls to create, save, and duplicate task templates. This is easy to do.
 Let's click on the Email Newsletter task template that we have created. This will apply a checklist that looks like this (note that you can customize your own task templates any way you'd like):
 On the right, you'll see a few things on the checklist:
- The name of each task. What needs to get done?
- When each task is due. You can easily adjust these deadlines.
- Who is responsible for each task. They can check off each task when it's complete.
 As work progresses on your email, you can also use Custom Statuses to indicate its level of progress. You can see the status in the bottom right:

Write an Email Subject Line Using the Built-In Email Subject Line Tester
Once it's time to start writing your email, begin with the subject line. You can use either the standalone web version of CoSchedule's Email Subject Line Tester to start, or you can use it built-in with CoSchedule:
Manage Workflow in CoSchedule + Set Up the Email Newsletter in Your Email Service Provider
Next, you'll need to create your email content in your email service provider. But, you can plan the content and organize your copy (provided you're writing copy using Google Docs or Word) in CoSchedule. Here's one way to consider approaching this. If you're creating content in Google Docs, then attach your Google Doc as an attachment to your project (you can also attach a Word doc as a file, link content from Google Drive or Dropbox, or write copy directly in CoSchedule with the built-in text editor—use the option that best suits your workflow): This makes your email copy easily accessible. You can then use Discussion Threads to discuss the email as your team collaborates throughout the process (if you have images that will be designed for the email, you can use Discussion Threads to pass the files along and share feedback for review purposes as well):
 Then, once all your assets are created, you can set up the email in your ESP and be ready for the final step.
Schedule Send Date and Time
Finally, it's time to actually schedule your email's delivery time and date. If you're using MailChimp, you can adjust the day and time within CoSchedule, or in your ESP. Other ESPs are one-way sync only, meaning that you'll need to schedule the day and time within the ESP (but your send day and time will then be reflected on your CoSchedule calendar as well).Start Using Your Email Marketing Calendar to Get Organized
You know you need an email calendar. You have the knowledge and skills necessary to set one up effectively. Now all that's left to do is make it happen.
This post was originally published on April 18, 2018. It was most recently updated and republished on Nov. 4, 2019. Ben Sailer contributed writing to this post.The post The Best Email Marketing Calendar Template You Need to Organize Your Newsletters appeared first on CoSchedule Blog.